Waits
The majority of the automation test script fails due to test scripts trying to interact with an element that does not exist on the web page due to some network lags. Eventually, you will face this problem and this lecture note will cover Selenium waiting logic that resolves this lag issue.

We can use the following wait logic in Selenium:
- Thread Sleep Command
- Implicit Wait
- Explicit Wait
- Fluent Wait
› Thread Sleep Command
The most trivial way to sync our test script with the element is to use Java's Thread.sleep() command. When you execute a Java program, your computer's CPU will dedicate its small portion to run your program. This small portion is called Thread.
* Technically, every running Java program requires three threads from your CPU, however, to simplify the concept, we will assume that it only uses one.*
We can dictate how long a thread, that is executing our test script, should be paused by providing durations in milliseconds.
Take note of the try..catch block. This code is unstable since CPU can interrupt and claim back the Thread that we put to sleep anytime it needs it. When this happens, Java will throw an error known as InterruptedException and executes the catch block. In our example, we will do nothing as you can see from the empty catch block of code ( // no-code ).
› Implicit Wait
Selenium offers simple driver configuration technique called Implicit Wait for basic test script and element synchronization. In this mode, we configure the driver object to interact with an element in a delayed fashion.
Let's say if we clicked a button, and a picture will be displayed after 3 seconds.
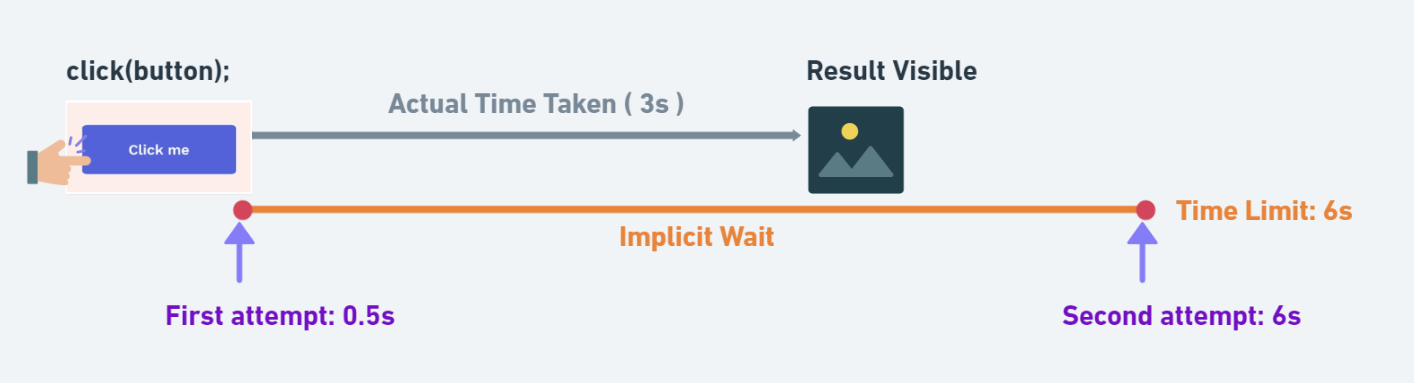
With implicit wait mode on, driver will attempt to interact with the picture at every 0.5s until it is visible. It will check for the picture until the time limit is reached. Once the time limit is reached, the TimeoutException will be thrown.
Please note that, once the implicit mode is turned on, it will apply to every automation action until the entire test case that uses the driver is executed. For this reason, implicit mode is known as global wait.
› Explicit Wait
Both Thread.sleep() and Implicit Wait technique results in wasted wait time. In our previous example, it took 3 seconds for a picture to be present, but the driver ended up waiting 6 seconds for it, wasting 3 seconds in the process. This waste time adds up to hours if thousands of automated test cases are executed.
To address this, Explicit Wait synchronization technique in introduced. Aim of this new technique is to wait for the expected condition with more check frequency known as polling frequency.
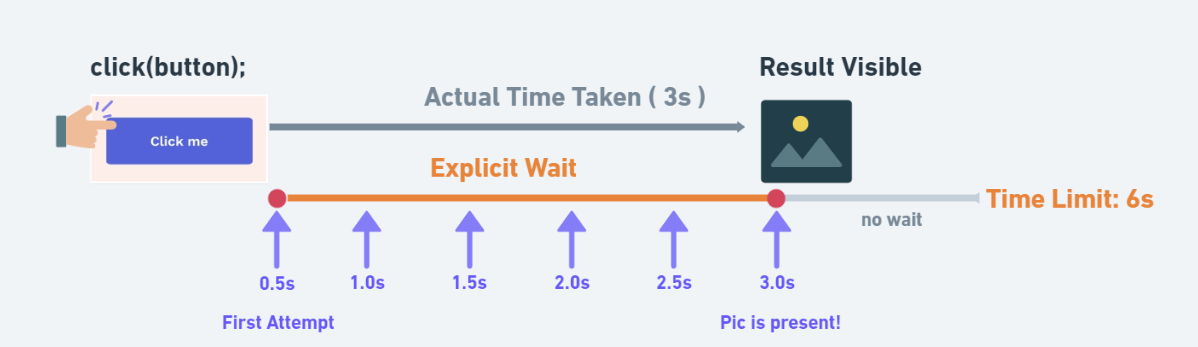
As you can see, Explicit Wait will poll every 0.5 seconds to see if the picture is present. It will stop waiting as soon as the presence of picture is detected. This way it will never waste time. If the picture is still not present after the time limit is reached, it will also throw TimeoutException error.
By default, the driver object does not have Explicit Wait capability. In order to configure it, we need to convert driver into WebDriverWait object and use its until(ExpectedConditions) method.
Note that Explicit Wait is known as local wait, meaning it will wait for one specific element until some expected condition is reached. After the wait is done, this mode will be turned off. You have to turn this mode on again for next usage.
Notable Expected Conditions:
› Fluent Wait
The Fluent Wait is customizable synchronization technique that existed before the Explicit Wait is introduced. As a matter of fact, Explicit Wait is popular implementation of Fluent Wait. For this reason, we do not use Fluent Wait since someone already gave us their customized fluent wait called Explicit Wait.
› Summary
Please watch the following video for the summary of all the topics presented in this code note.
GitHub Repo: AlphaleafTech/note_selenium
If the link does not work:
Please watch the video with 1.25 playback speed
Note Summary Video